
BBSHD Review and Install
If you’d like to discover how to take an electric bicycle conversion kit and to turn your ordinary bike into an ebike with all of the latest electric features, you are in the right place. Here we will show you the BBSHD Review and Install.
Riding an electric bike puts you in charge. You decide when you’d like to pedal and when you’d like to cruise with your electric motor.

Bikes were invented around 1817 and they’ve been about the same since that time.
Put your feet on the pedals and use your muscles and energy to get to your desired location.
Snooze.
Fast forward 200 years and today’s electric bicycles offer an entire new dimension of two wheeled transportation.
The electric bicycle conversion kit that I’m going to show you today is a silent, eco friendly and powerful kit.
With today’s technology we will unlock the full potential of your bike.
If you are searching for lower priced ebikes, check out the best ebikes under 500 dollars.

Follow us on reddit @ expedition_electric
Whether you are using your bike on a mountain bike trail, in the city, as a commute to work, or a stroll through the park this kit can be the right fit for you.
About the Motor
The electric bicycle conversion kit that I will be talking about today is the Bafang Mid Drive BBSHD 48 Volt with a 1000 Watt Motor.
Here is the seller I used to purchase the motor.
Did you know that the average Tour De France rider maintains a speed of 25-28mph on the flats.
With this Mid Drive kit and a 48V 13Ah battery from Unit Pack Power, my cycle has achieved a top speed of 28 mph on a flat road. This speed was achieved without pedaling the bike.
The bicycle used for this test and this conversion has 4 inch fat tires. I imagine with a bicycle with skinnier tires, you would achieve a higher speed..
If you would ever want to go that fast!
We would love to see your ebike conversion. Tag us in a photo on Instagram.

Check out the step by step video and BBSHD Review on YouTube. Make sure to subscribe to our channel for the latest and greatest ebike info!
I’ve also travelled about 20 miles without pedaling the bike and still had battery charge,
So I imagine if you were pedaling the bike with the pedal assist feature you could probably go further than you would want.
I’d love to hear your feedback on this if you decided to install this kit!
To install the electric bicycle conversion kit you will first need to make sure you’ve chosen the right bike.
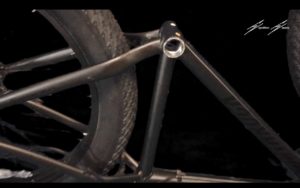
I recommend using a newer bicycle with caliper or hydraulic brakes.
The photo below shows the brake disc on the wheels

These types of brakes are the standard for quality ebike conversions and are an important safety feature that you need.
How to measure
You will need to measure the bottom bracket of your bicycle for a mid drive motor kit installation.
In this photo I’m using the measure app to find the exact length of the motor needed for correct install.

You can also use a caliper tool to find the most accurate measurements. These mid drive motors come in a variety of sizes so make sure you have the right size bottom bracket before you start.
If you have any questions about this, you can ask me in the comment section.
You’ve got the right bike and now you’re ready.
To successfully install this electric bicycle conversion kit you will need a few specialty bike tools to complete the task.
Don’t worry, I will show you which tools I purchased to help me make this ebike.
If you are on a budget with your electric bike build you should check out this high performance cheap ebike conversion kit.
BBSHD Review -How to install a kit
If you’ve picked out a bicycle and kit you will want to prepare your bike to be taken apart.
Find a large space to work.
I like to use a bike stand for this part of the conversion.
If you don’t have a bike stand you can also turn your bike upside down.
Use a soft surface under your handlebars.
Be careful not to damage your shifters or brakes.
You are going to start your conversion by removing the pedals from your bike.
For this job I used a Park Tool PW-5 Home Mechanic Pedal Wrench.
This tool worked great because it is narrow and easy to maneuver in the small pedal area.

Remember where you put these pedals because you will need to reinstall them later!
***tip Pedal removal can be tricky.
If the pedal doesn’t seem to be budging, you might turning the pedal bolt the wrong way.
Next you will remove the crank arms bolt.
For this job you will need a large hex key.
I actually owned about 40 different hex keys before performing this ebike conversion, but none were large enough for the job.
This is the hex key set I purchased, and it worked great for the conversion.
Next we will remove the crank arms.
To do this you will need a crank puller tool.
You may need to put some muscle into the turning of the crank puller tool.
My bike made some interesting sounds with the required force, but the crank arms came off without damage.
I used the Park Tool CCP-22 and it worked great.

You’re almost complete with the disassembly of your bike.
One last step.
You’ve got this.
Remove the bottom bracket.
I used the BBT-22 and a ⅜ ratchet for this job.

This is the part of the conversion that requires the most muscle.
This can be tough to remove since this part of your bike was designed to stay put.
I like to turn the bike upside down for this part of the conversion.
I used one hand to hold the BBT-22 in place while the other hand turned the ratchet.
The right side of your bike with the chain will loosen clockwise.
The left side loosens counterclockwise.
Be patient with this one, and make sure you are turning the ratchet the correct direction. Once you’ve completely loosened the bottom bracket it should be easy to remove.
You now have a bike that is fully prepared for an electric install.
BBSHD Review- How to Test your kit
You’re going to want to test your electric bicycle conversion kit before install.
The last thing you want is to have a fully assembled ebike that doesn’t function.
You don’t need to be an electrician to power up the ebike, just follow these few simple steps.
The cords in this kit are all color coded and are lined up with arrows.
Look for the colors and arrows when you connect.
You will need to get a rechargeable lithium ion battery to power your ebike.
The battery I used for this conversion is 48V 13ah Unit Pack Power Battery.
I’ve asked the company a few questions and they are responsive and helpful.
Before you connect the battery to the red and black cords, make sure the battery is powered off.
You never want power flowing while making wire connections.
Once your connections are secure, turn on your battery and power up your display.
Make sure your display turns on.
Next, test your throttle to see if your motor turns.
If the display and throttle are working, you are ready for install.
If one or neither are working, I suggest checking your wire connections or charging your battery for several hours.

If your motor and display pass the test, you are ready to begin the motor install.
How to install the motor
Installing the motor is a more intimidating task than it sounds. It really only takes five simple steps.
Step 1. Connect the chain ring to the motor with a hex key. Tighten securely but don’t overtighten.

Step 2. Insert the motor in the bottom bracket. (line up the chain ring on the right side of the bike)
Step 3. Connect the fixed bracket to the motor using a hex key. The bumps on the fixed bracket should face towards the motor.

Step 4. Use loctite to secure the steel nut on the motor. Loctite helps prevent slipping of this crucial part.

You want to securely tighten this nut with The HCW-5 wrench.

Without this nut secured, the motor has a chance of moving around and causing damage.
Step 5. Install the Aluminum nut, which covers the steel nut.
The motor of your electric bike conversion kit is almost ready to take you cruising.
After you complete the motor installation, you will want to put on the pedal arms that are included in your electric bike conversion kit.
These arms are labeled left and right so make sure they go on the correct side.
Use your Hex keys for this job.

Now you’re ready for your pedals.
Make sure to tighten the pedals with a pedal wrench.
After you’ve completed this, turn your bike back to the right side up to finish your ebike conversion.
BBSHD Review- How to assemble the handlebars
The Bafang electric bicycle conversion kit has a variety of options to choose from when it comes to displays.
Screen size, functionality, color, and display options are all factors to consider when ordering your display.
I ordered the 750c and it does everything I want it to.
It tells me how fast I’m moving, how far I’ve travelled, the battery life, and shows me which level of pedal assist I’m using.
Here is a link to the conversion kit motor that is featured in this blog.
To keep the display securely fastened on the handlebars I installed rubber inserts near the mounts. A hex key was used to keep the display snug to the handlebars.
To get your new ebike moving you will need to install the throttle.
To do this you must first remove the handlebar grip.

There are a lot of methods and techniques to do this! For this bike I was able to simply twist and pull the grip to remove.
Other bike grips have proven to be more difficult. If this is the case you might be able to loosen with WD-40 or soap on a screwdriver.
In some cases, you may need to cut the grip off. I recently had to cut the grips off of a bike since they were glued on.
When you install the thumb throttle, keep it at a close and safe distance to your grip.
You want to have good balance as you provide power to your bike.
Tighten the throttle to the handlebars using a hex key.
You are almost ready to GO, but first, you must be able to STOP!

Stick the brake sensor and magnet to the brake level. These should be almost touching.
Your electric bike conversion kit should include a red backed sticky tape to secure the magnet.
When the magnet is separated from the sensor the motor will stop providing power.
I superglued both of these in position on the brake handle once I tested that they were functioning properly.
If an “!” shows up on your display, then there is a good chance that the magnet position needs to be adjusted closer to further from the sensor.
In order for your display to tell you how fast and far you travel you must first put on the speed sensor.
You will want to install this on your back tire.
The magnet part of the speed sensor needs to be securely fastened to the spoke. The Magnet will pass very close (1-3 millimeters) to the Circle Part of the speed sensor.

If the magnet and sensor are too far apart, you will not receive a reading on your display.
Test your sensor by powering up your display, lifting the back of the bike slightly and manually spinning your tire.
Once the sensor is successfully reading the speed, you will want to secure the sensor with the small zip ties that are provided in your electric bicycle conversion kit.
BBSHD Review- How to Install a battery
In the bike in this example I installed the battery on the downtube. The battery I installed is a Unit Pack Power 48V 13Ah Lithium Ion Battery.
I would have used my slightly larger 48V 15AH battery for this conversion but it would not fit on the downtube.
The performance difference of these two batteries is that the 15AH battery takes me 1-3 mph faster and lasts an extra 5-7 miles without pedaling. The 13AH has proven to give more than enough speed and longevity during rides.
I have not taken the battery below 40% even on 20 mile rides. It is not recommended to fully drain your battery during use.
In order to fuel your ebike you need a quality battery.
Before purchasing a battery it’s a good idea to figure out where you want to install it on your bike.
(Most batteries provide you with exact size dimensions)
The two most popular ebike battery locations are on the downtube and on a rack above your back tire.
Your bike design may determine the location for you.
If you install the battery on the downtube of your bike you will need to have removable bolts in this area.
The batteries provided in this example have removable bottom plates.
Use the keys provided with your battery to unlock from the bottom removable plate.
To do this, hold the battery with your left hand while sliding the bottom plate towards the direction of the black and red wires.
Once the plate is removed, securely fasten to the bike using hex keys.
After you’ve done this, use your battery keys to lock the battery into the bottom plate.

Before getting on the bike for your first ride, make sure you have all of your electrical cords securely fastened to the bike with zip ties.
Keep a good distance between your tires and all cords.
I’ve seen tires chew through ebike cords in the matter of minutes!
Perform a final inspection to ensure all parts of your bike are securely fastened. You’ve got to make sure your bike is safe before you reach it’s full potential.
You are ready to hop on your new ebike and go for a stroll!
Be careful out there, you may want to brush up on your cycle safety.
I hope I’ve helped you discover how to take an electric bicycle conversion kit and to turn your ordinary bike into an amazing ebike.
Stay tuned for the updated blog of the 500 mile BBSHD Review.
You are ready to hit the road.
On every electric bike conversion you will probably learn something new.
With practice you will get faster at disassembling, installing the motor, and organizing the electronic components of the bike.
You are on your way to unlocking the full potential of your bike.
I wish you luck and would love to see your finished ebike!
If you hit any roadblocks in your conversion, feel free to reach out and together we can find a solution.

Comments
Loading…